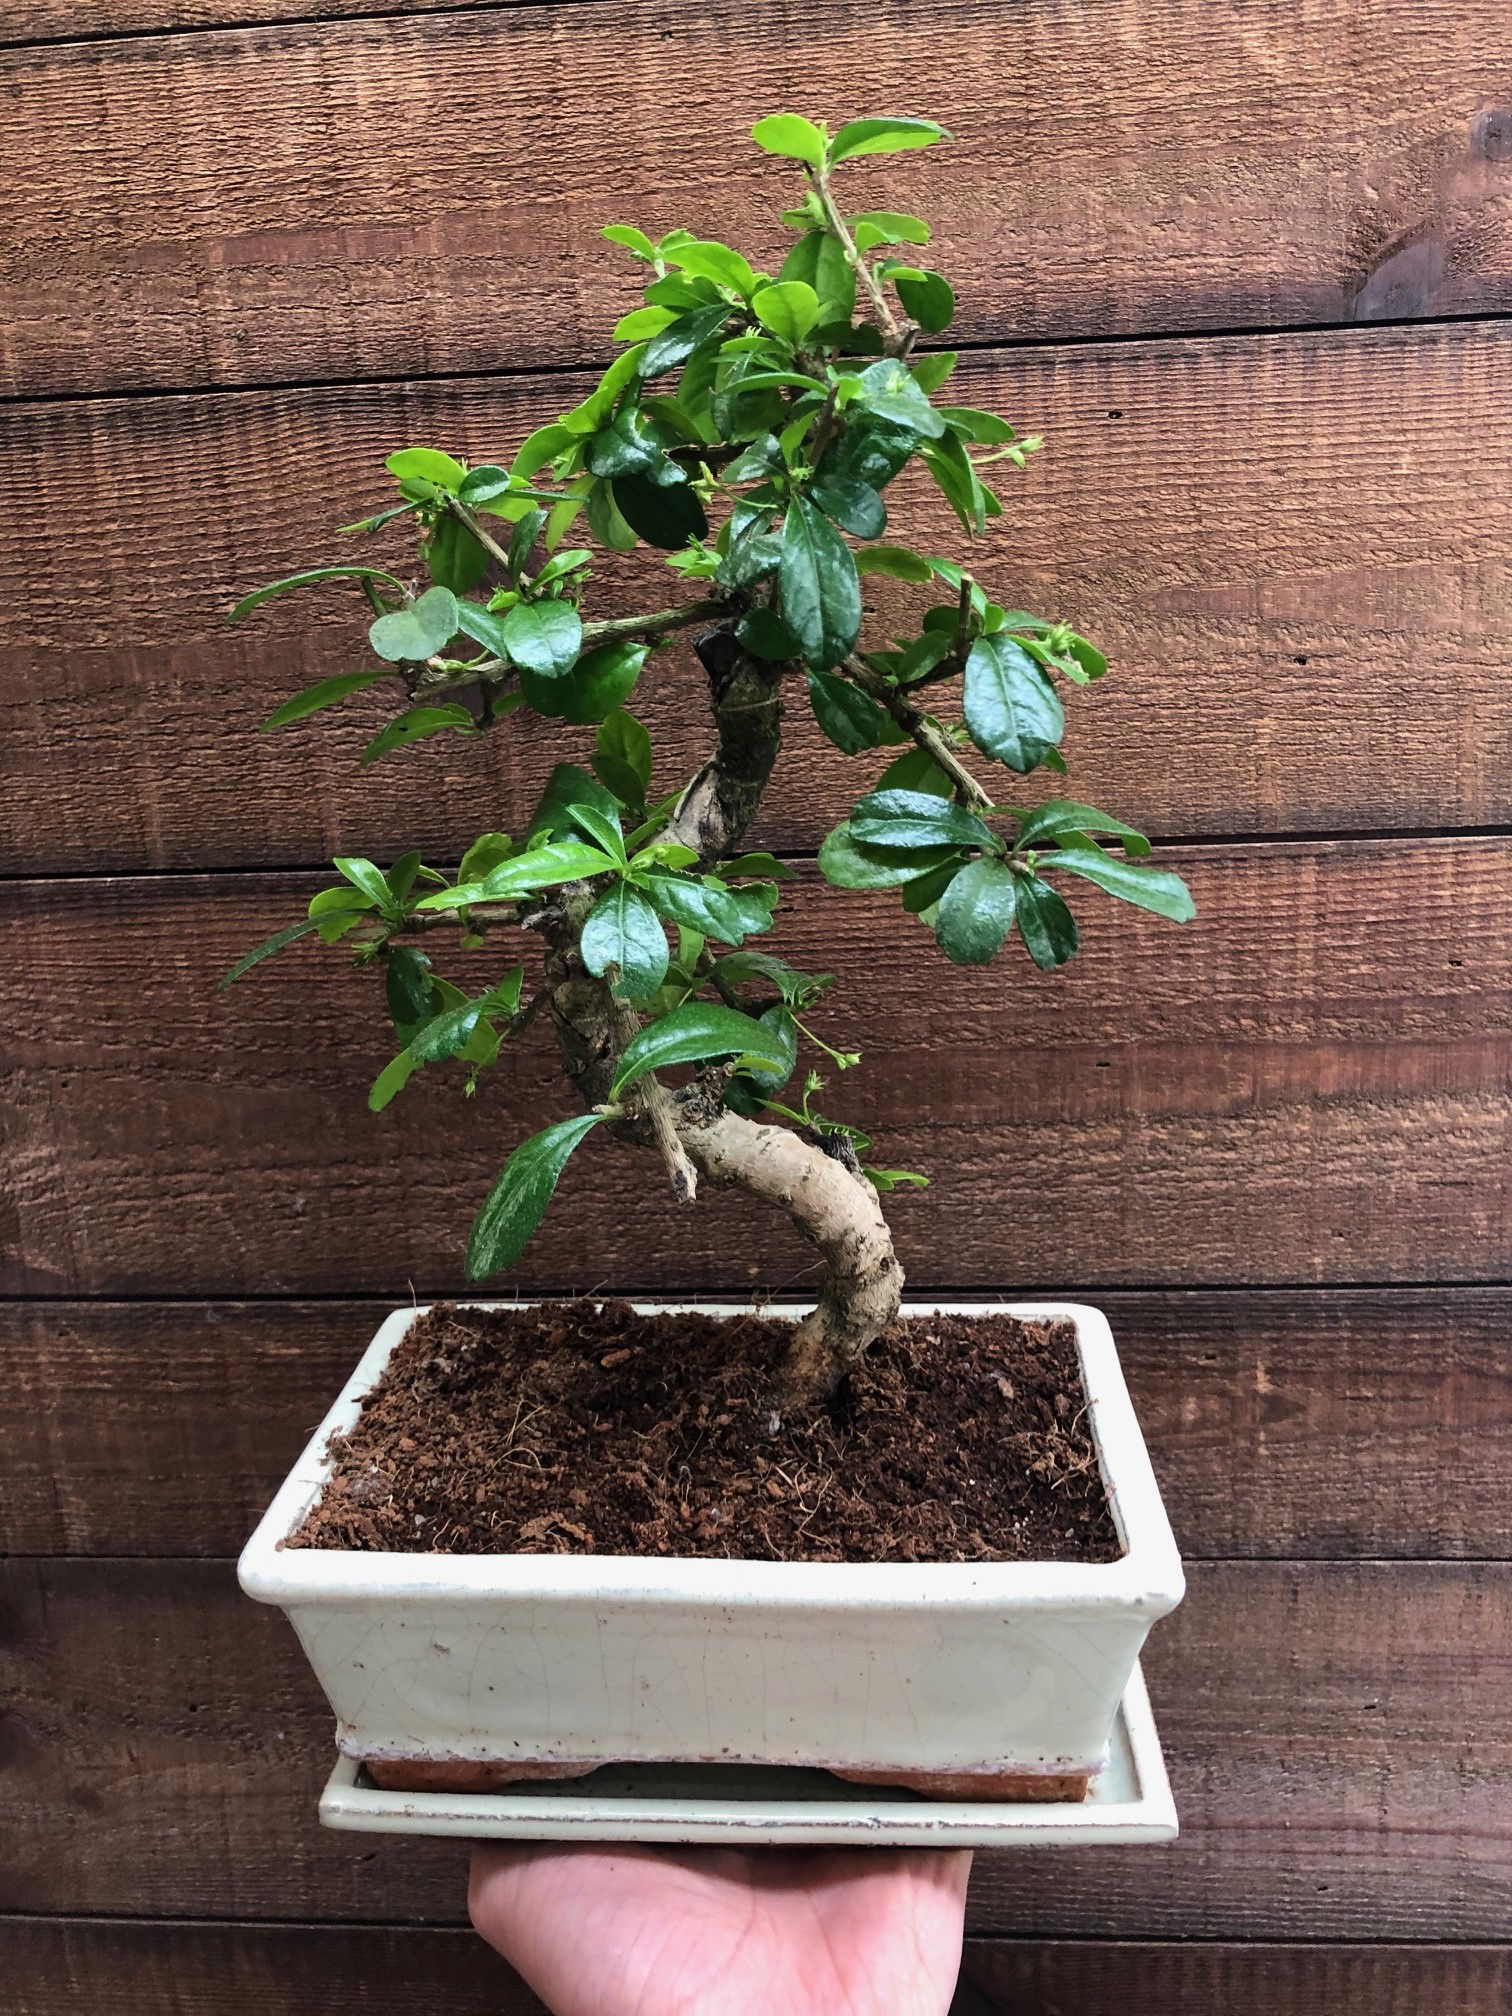
Carmona microphylla - Oriental Tea Tree
Contents
- Top Tips
- Location, Water, Humidity & Fertilisation
- Common Issues
- Origins, Temperature, Propagation, Repotting & Toxicity
Need the answer to a specific plant query? Book a 1-to-1 video call with THE HOUSEPLANT DOCTOR™, the website's friendly author, to overcome and address your niggling problem! Available on iMessage, WhatsApp, Facebook Messenger & more.
Top Tips & Info
- Care Difficulty - Moderate
- Provide a bright, indirect location to entice good quality growth. Settings that are close to operating heat sources or the direct sun will only result in dehydration and death.
- It's essential not to move the specimen from place to place, as a sudden change to its environment will result in shedding leaves.
- Allow the soil's top surface to dry out in between waters. Dehydration is a prevalent issue among owners due to the shallow dishes which are used to keep the specimen within the desired size.
- Fertilise using a 'Houseplant' or 'Bonsai' labelled feed every four waters in the spring and summer, reducing this to every six in the colder months.
- Repot every three years with a 'Houseplant' or 'Bonsai' labelled potting mix and be sure to respect the roots as transplant shock is an issue that could cause wilting, sudden leaf-loss or even death.
- Gently hose the foliage down once a month to remove the thin layer of dust and improve its overall appearance.
Location & Light - 🔸🔸
The combination of good soil moisture with a bright, indirect light location will provide the best results for your Bonsai. Sunny areas should be avoided at all costs as prolonged exposure to the harsh rays, or persistent under-watering will result in pale leaves, stunted growth and gradual decline. If it's too hot for a chocolate bar, it'll also be too hot for the plant!
Water - 🔸🔸
Maintain evenly moist compost, allowing the top layer to dry out in between waters. Persistent droughts or drying soil will significantly increase the chance of dehydration and death as its shallow pots won't retain moisture for long. Under-watering symptoms include stunted growth, dry patches appearing on its leaves and yellowing older leaves; these issues are either due to an over-crowded pot, too much light or forgetfulness. If severe dehydration occurs, introduce a humidity tray and create a watering-schedule/reminder to avoid further destruction. Over-watering symptoms include yellowing lower leaves, mouldy/heavy soil & stunted growth. These issues are typically caused by inexperience, low temperatures or not enough natural light. Take the specimen out of its pot and inspect its root health; if you feel that root rot has taken over, be sure to visit this link!
Humidity - 🔸🔸
Create a humidity tray to provide a moist and stable environment for your plant. If the surrounding saturation is too low or the heat too high, its leaf-edges may start to brown over and curl, especially in direct sunlight. Hose the foliage down from time to time to hydrate the leaves and keep the dust levels down.
Fertilisation - 🔸🔸
Fertilise every four waters during the growing period before reducing this to every six in the autumn & winter. Although an all-round 'Houseplant' fertiliser will still do the job, we'd recommend using a specific 'Bonsai' labelled fertiliser as it'll support the vital thirteen nutrients that this species will need to grow.
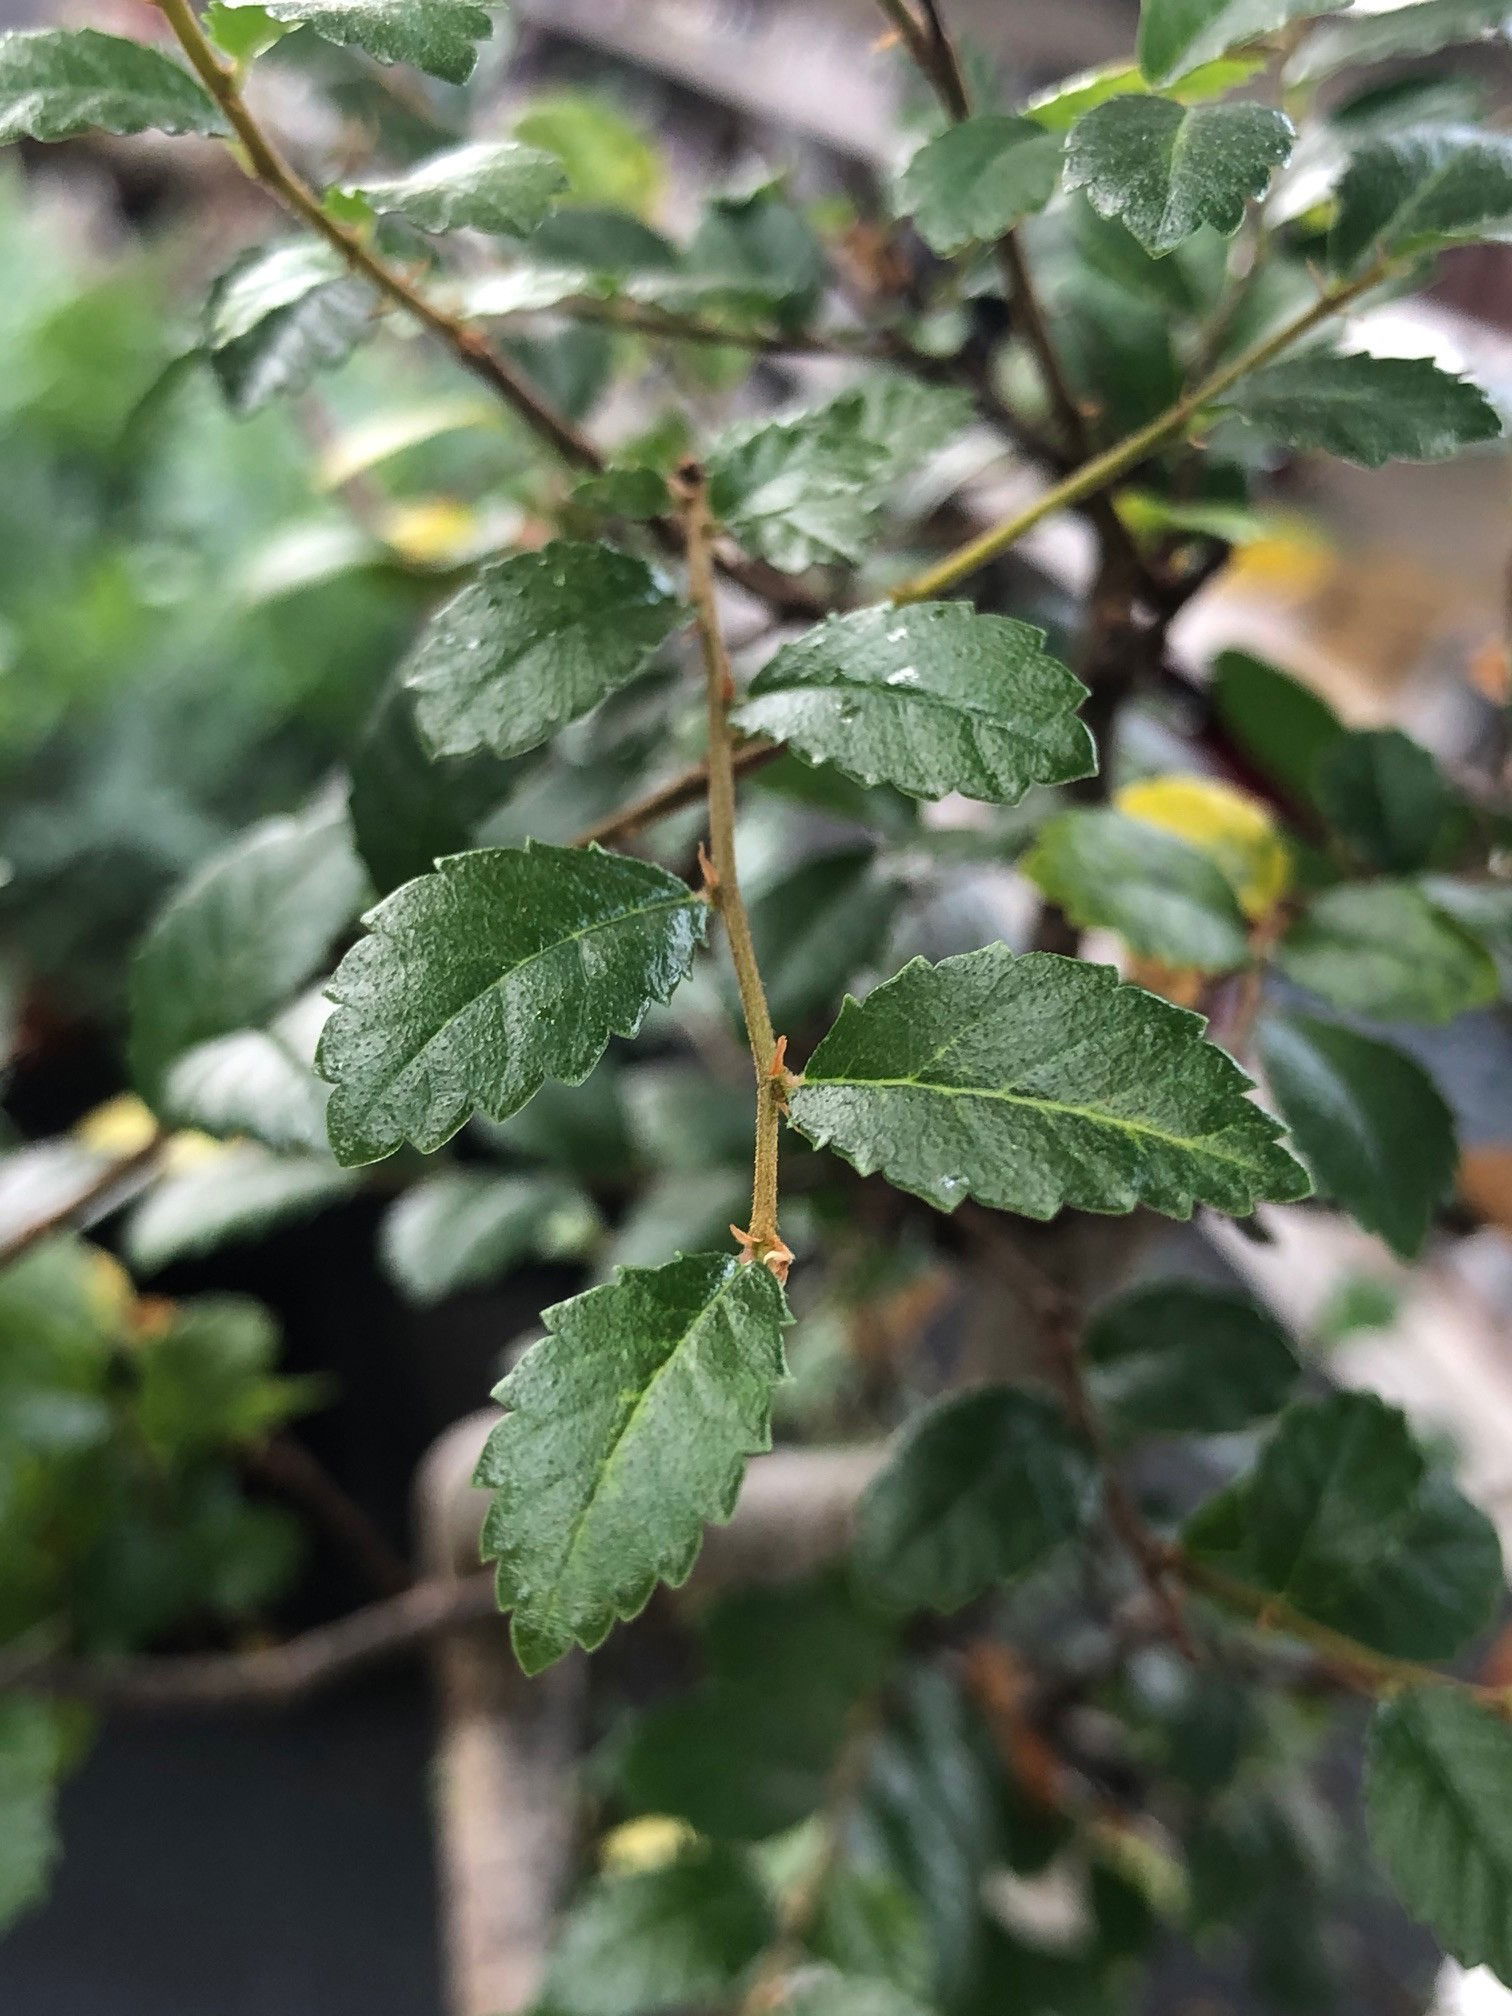 A general rule when purchasing a Bonsai is to know that thinner-leaved specimens (Like Carmona or Chinese Elm, pictured) are less tolerable to dehydration compared to Ficus alternatives.
Common Issues with Indoor Bonsai
When a Bonsai is severely dehydrated, most of its leaves will yellow and fall off - leaving you with a naked plant. Although it may spell the end of juvenile plantlets, there may still be light at the end of the tunnel for more established specimens. If its stem is still plump without any signs of retraction, prune-away the severely affected areas and contain the plant (with its pot) in a transparent bag that has small holes. Keep the soil continually moist, providing a good level of indirect light and temperatures above 15°C (59°F). After a few weeks, new life will form in the nodal junctions on the stems, signalling the start of its recovery process. remove from the bag after two months of solid foliar growth and allow to grow 'leggy' for around six months thereafter (no pruning). You can begin pruning after the seventh month of removing the Bonsai from the bag.
Root rot is another common issue with specimens sat in too moist or waterlogged soil for long periods. Symptoms include rapidly yellowing leaves, stunted growth and a rotten brown base - please note that under-watering will cause yellowed leaves, too. Take the plant out of the pot and inspect health below the soil line. If the roots sport a yellow tinge, you're good to go, but if they're brown and mushy, action must be taken immediately. More information about addressing root rot can be found on this link.
Mould developing on the soil means two things - too little light and over-watering. Despite the harmlessness, it'll prove unsightly to most gardeners and is therefore removed once known. To remove, replace the top two inches of the soil for a fresh batch of 'houseplant' compost. Either increase the amount of light received (no direct sunlight for the first few weeks to prevent environmental shock) or decrease the frequency of waters slightly. If the mould is accompanied by yellowing lower leaves, you may also have a case of root rot.
Always use lukewarm water, and if you choose to use tap water, allow it to stand for at least 24hrs before application. This species tends to be quite sensitive to temperature change, so pouring cold tap water immediately into the pot will not only add fluoride into the soil, but it could even cause yellowed leaf-edges over time.
Origins
If you thought that Bonsai originate from Japan, you're wrong! From ancient paintings and manuscripts, historians can date evidence of 'tree art' way back to the 7th century in China, a whole five hundred years before it arrived in Japan. Ancient Buddhists had an immense passion for both flowers and plants, mainly due to the wide varieties of specimens native to the country. The Chinese name 'Penjing' grew out of favour for several reasons, and it was the Japanese term 'Bonsai', meaning 'tray planting', that stood.
Bonsai was traditionally deciduous; however, tropical plants (i.e. houseplants) have been used due to their fast-growing antics, accelerating the ageing Bonsai steps profusely. As time has progressed, many other species are being to be cultivated for forms of art; Jade Plants, Bougainvillea, Schefflera and Citrus Trees are among most notable. The latter, although not directly used for Bonsai, adopt a similar mannerism with pruning back growth to keep its overall size down for better fruiting and overall appearance.
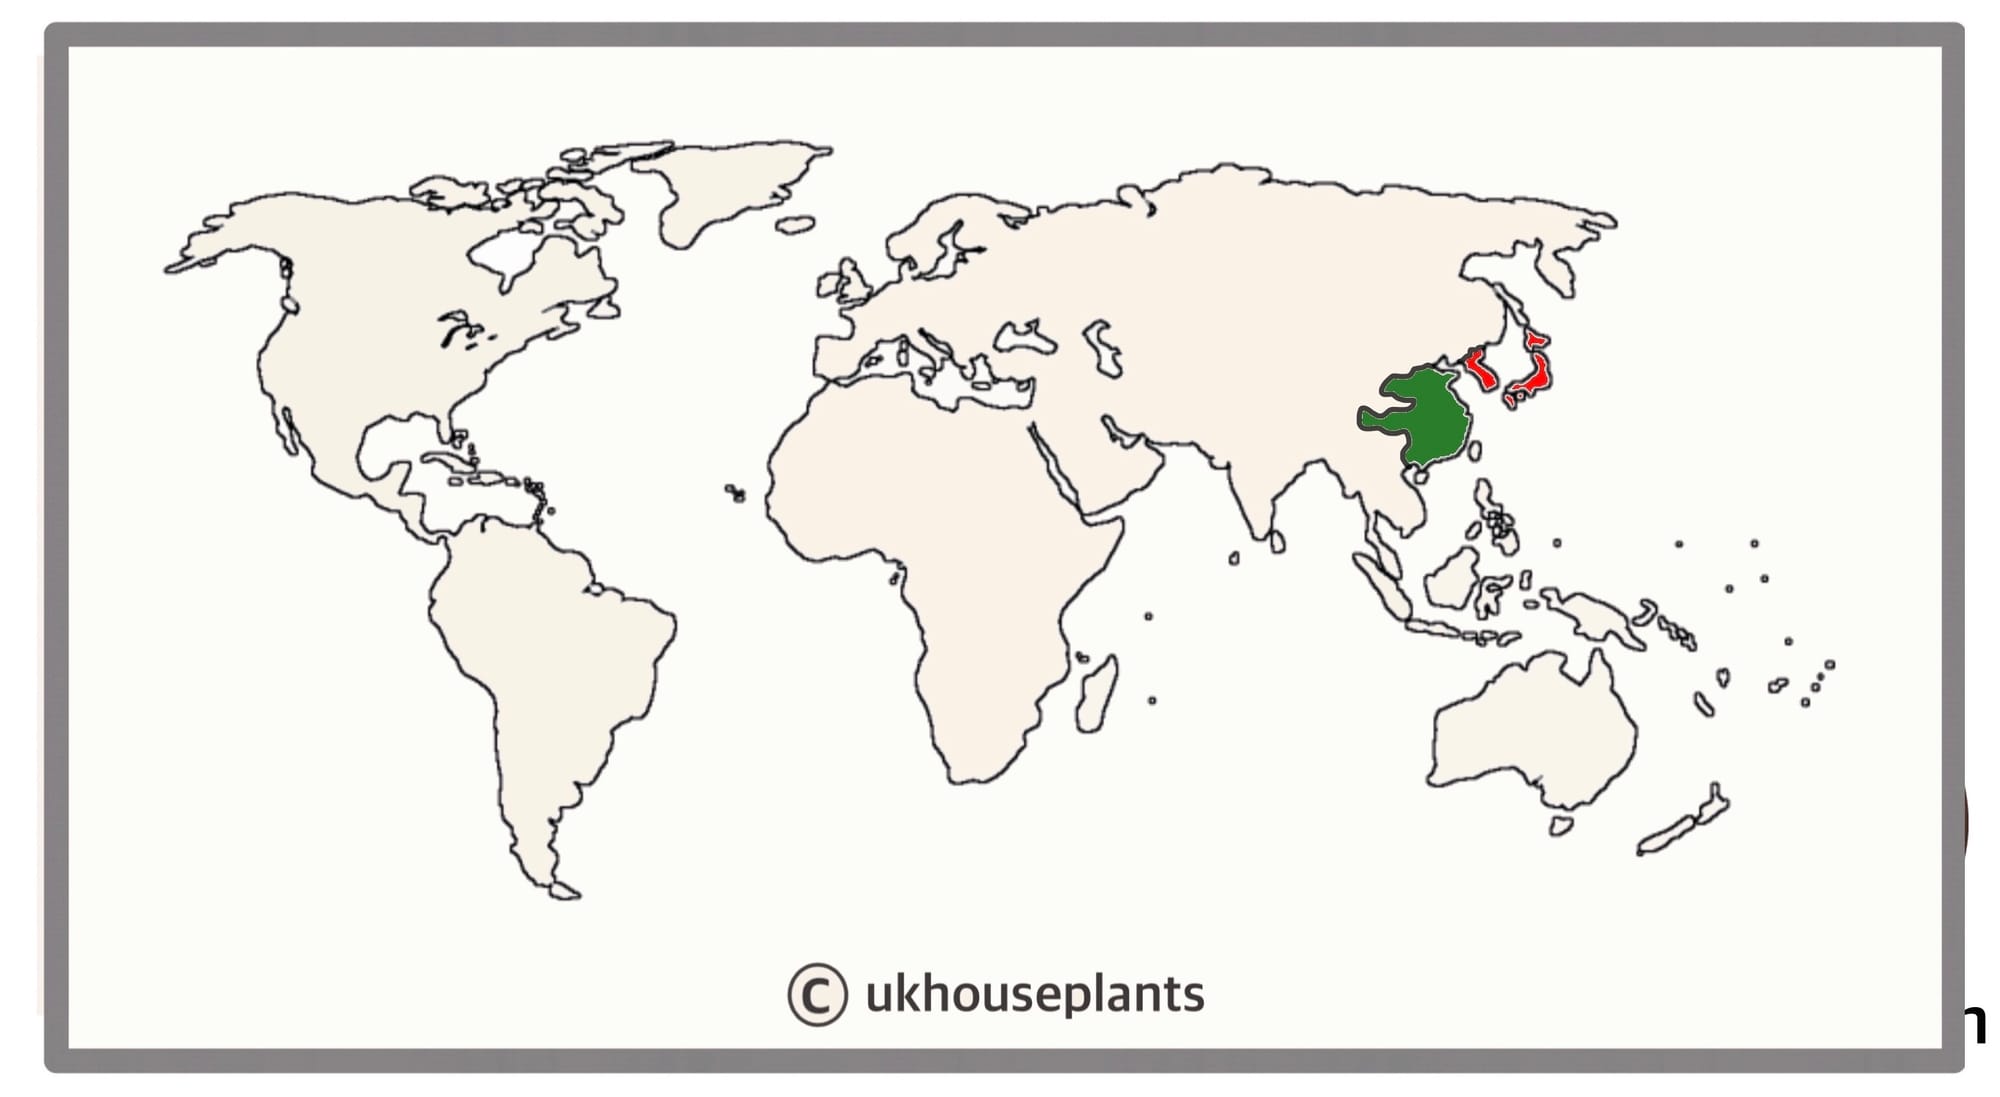 The Historical Distribution of Bonsai Art, from the seventh-century in China (Green) to the twelve-century in Japan & Korea (Red).
Temperature
12° - 26°C (59° - 78°F)
H1b (Hardiness Zone 12) - Can be grown outdoors during the summer in a sheltered location with temperatures above 12℃ (54℉), but is fine to remain indoors, too. If you decide to bring this plant outdoors, don't allow it to endure any direct sunlight as it may result in sun-scorch and dehydration. Regularly keep an eye out for pests, especially when re-introducing it back indoors.
Spread
For Bonsai currently under training, allow the trunk to thicken by letting it run slightly 'wild', loosening the structural wire every so often. Be patient - it'll take in the region of 4 - 10 years for the trunk to achieve the desired girth. For those that were bought from a shop, the size shouldn't change if pruned regularly.
Pruning & Maintenance
Especially for smaller Bonsai, pruning is another necessity on the list. Either use pruning scissors or fingers to take back the leggy stalks (leading growths). At the beginning of spring, be slightly brutal, as new leaves will come back and make the tree look much bushier. The image above shows where to cut as the juvenile growth can be directed in a specific direction from its alternate growth habit.
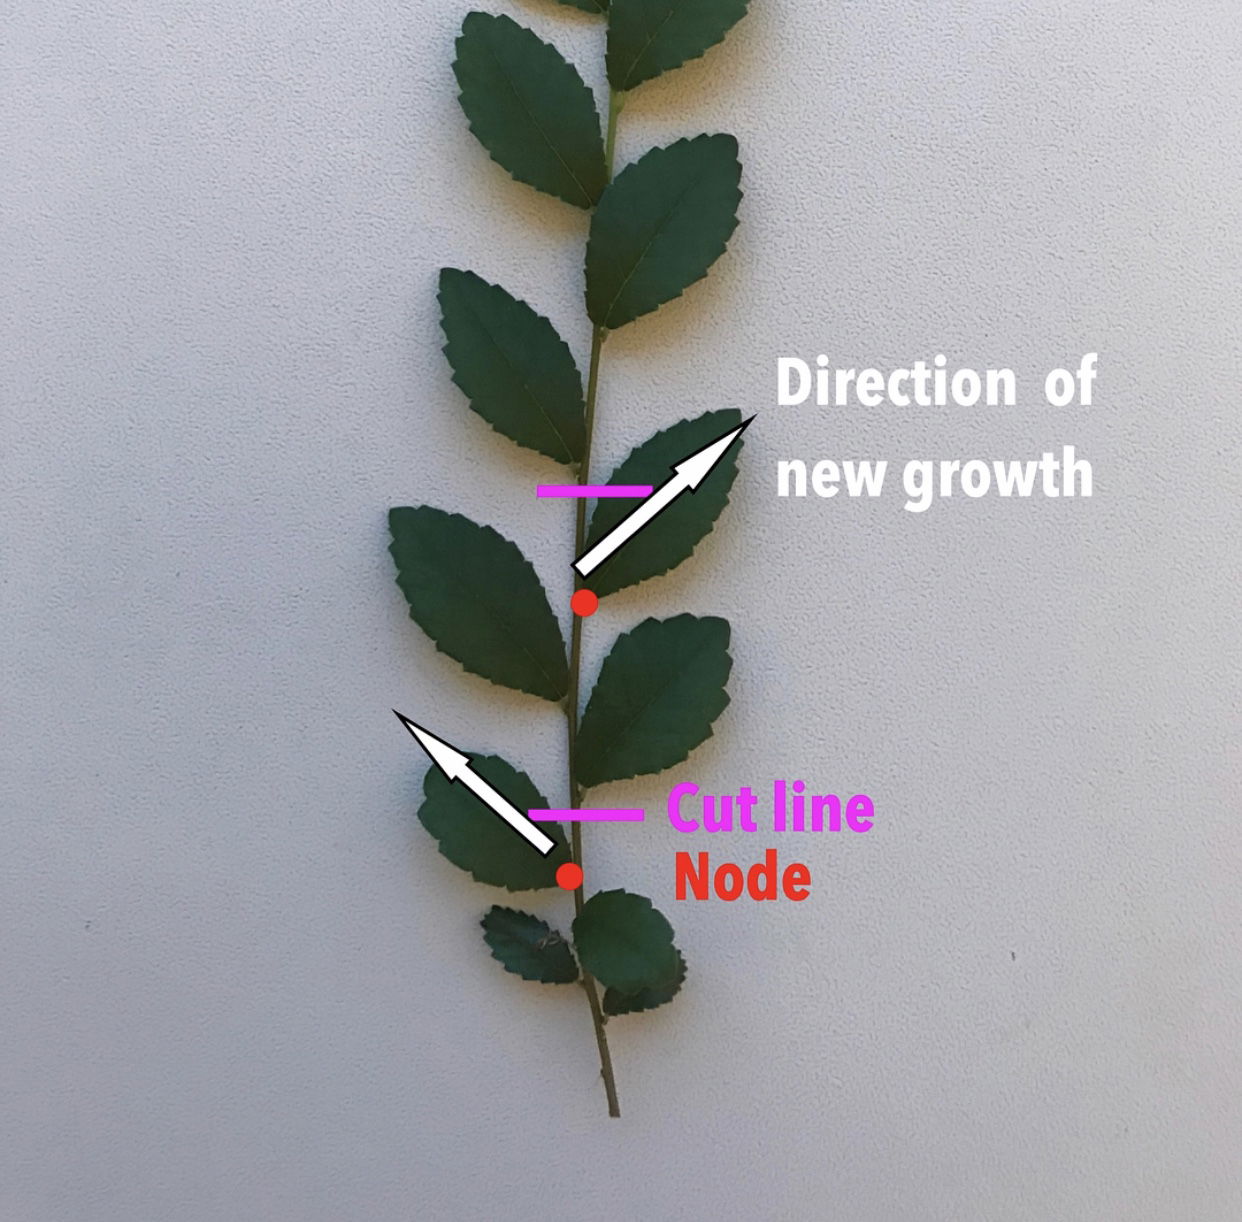 ukhouseplants' depiction of where to direct the growth of an alternate Bonsai. Please note this can only be performed on 'Alternate' growing specimens.
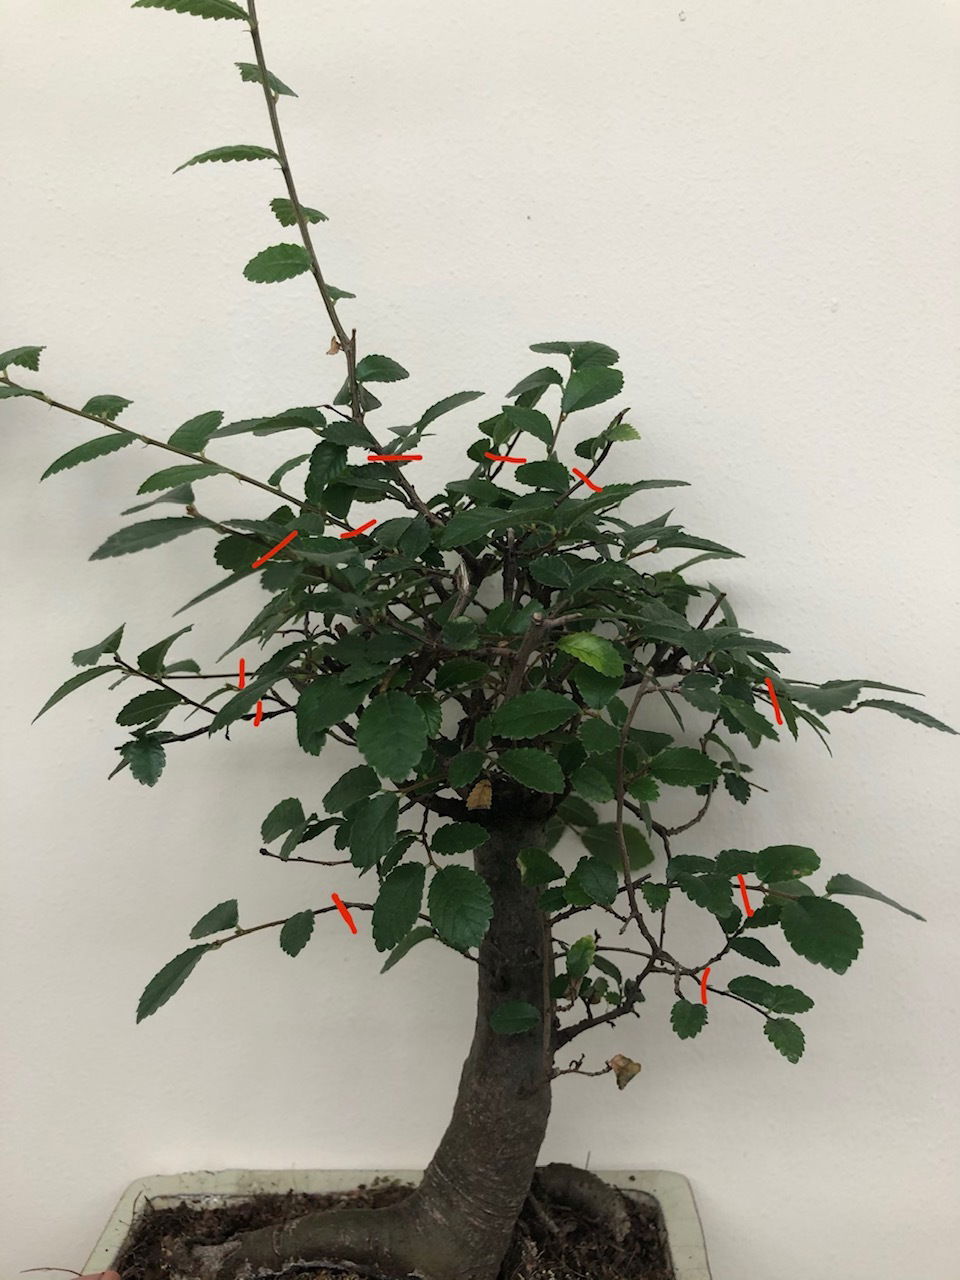 Example 1 of how to prune a slightly leggy Bonsai.
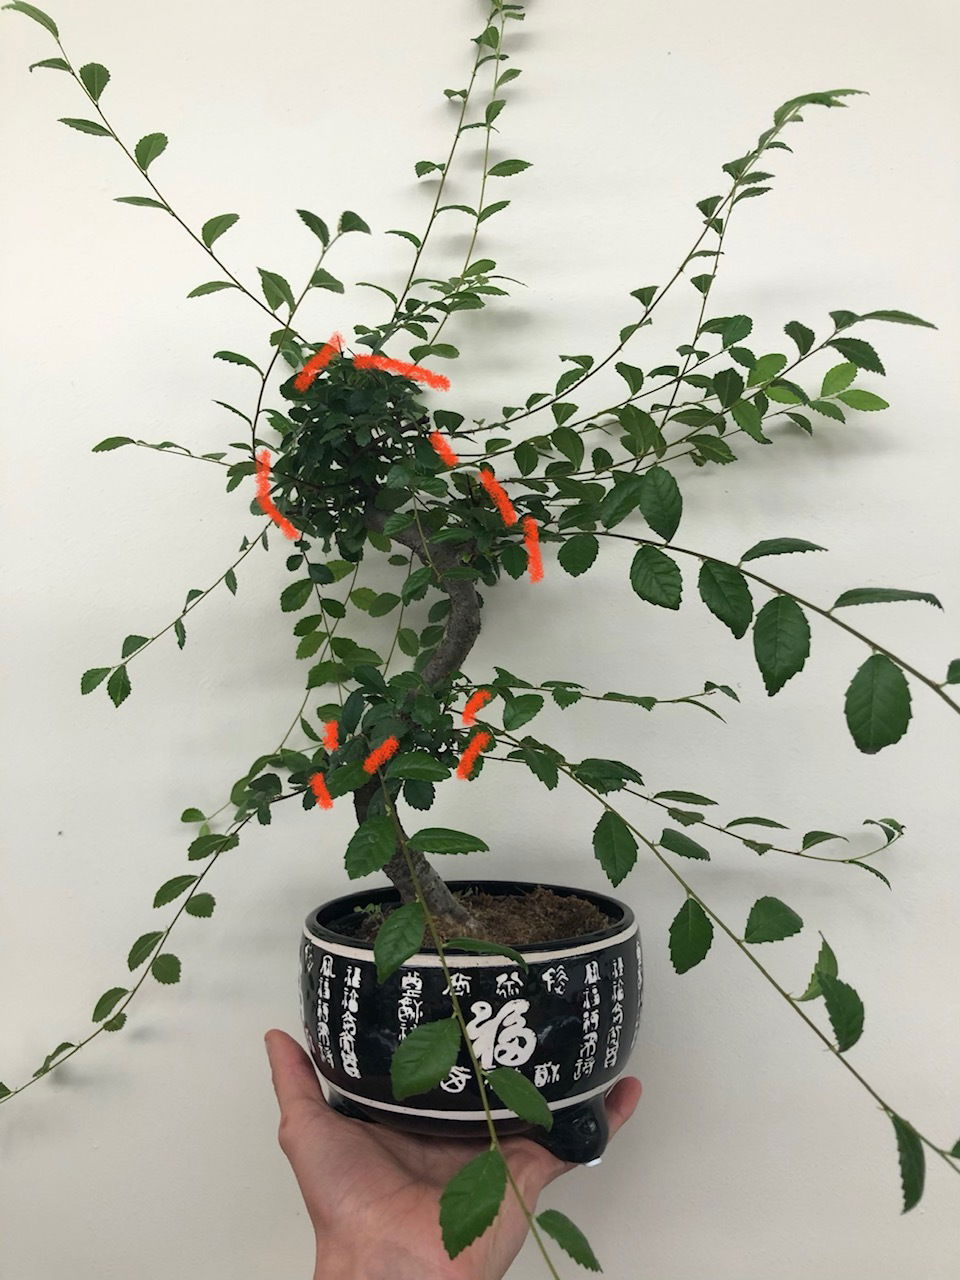 Example 2
Propagation
Stem & Eye Cuttings (Hard) - This method of propagation is troublesome without the aid of bottom-heat and a controlled environment. Choose the healthiest, most established stems that are wooded, yet still juvenile enough to bend slightly, being just thicker than a pencil. Each cutting should only have ONE leaf, and a small portion of the stem to either side of the node. Cut directly below a node using a clean knife to reduce bacteria count. Situate the cutting into moist 'Houseplant' compost, with the only the leaf sticking out of the soil. Blackleg can occur when the bottom wound becomes infected, resulting in propagation failure - typically caused by water-logging or a too-damaged wound. Maintain bright light and evenly moist soil with the avoidance of direct sunlight or cold draughts. Wrap the pot (& foliage) in a transparent bag or within a miniature greenhouse, and provide bottom hear of temperatures above 18°C (54°F). Remove the bag and place into individual 7cm (3 inches) pots once the second new leaf emerges. Follow the same care routines, as mentioned in the article's top half. This method will take up to five months, so patience and the correct environment are paramount for success!
Flowers
Although most specimens won't flower, Carmonas will readily flower in the spring if it's exposed to persistent droughts and cool winter temperatures. Small inflorescences will develop along the unwooded stems, lasting up to three weeks with each white flower lasting up to seven days.
Repotting
Repot every two years in the spring, using either a 'Houseplant' or 'Bonsai' labelled compost and the ORIGINAL container. Hydrate the plant 24hrs before tinkering with the roots and remove the specimen from its pot afterwards. Reduce the rootball by a third with a clean pair of scissors to keep the plant within its desired size. Add a layer of the compost in the pot's centre and rest the specimen onto the new soil. Fill the gap between the roots and pot with some further compost, gently tapping either side to remove any air pockets. For those that have signs of root rot, click on this link to learn more about this issue.
Book a 1-to-1 video call with THE HOUSEPLANT DOCTOR™ if you'd like a personal guide to repotting your houseplant. This will include recommending the right branded-compost and pot size, followed by a live video call whilst you transplant the specimen for step-by-step guidance and answer any further questions!
Pests & Diseases
Keep an eye out for mealybugs, aphids, spider mites, scale, thrips & whitefly that'll locate themselves in the cubbyholes and undersides of the leaves. Common diseases associated with Bonsai are root rot, leaf-spot disease, botrytis, rust, powdery mildew & southern blight - click here to learn more about these issues.
Toxicity
Most Bonsai are classified as poisonous, and if parts of the plant are eaten, vomiting, nausea and a loss of appetite could occur. Consumption of large quantities must be dealt with quickly; acquire medical assistance for further information.
Retail Locations
Most Garden Centres, Dobbies, B&Q, Blue Diamond, Online Stores.
Book a 1-to-1 Call with THE HOUSEPLANT DOCTOR™
If you need further advice with your houseplants, book an advice call with ukhouseplants' friendly and expert writer today! This can be done via a video or audio call on most apps, including Facebook, FaceTime & Skype. A ten-minute call costs £5.99 (US$7), or £15.99 for thirty minutes. You can ask multiple questions, including queries on plants, pests, terrariums, repotting advice and anything in between. Please consider supporting this service to keep ukhouseplants thriving!